The airbrush exercises to practice first, in order
Practice dots, straight lines, dagger strokes, circles and ovals, gradients, and a sphere — in that order, in short sessions on paper.
Each drill adds one variable on top of the last, and each one has a completion standard you can judge by eye. The table below is the whole plan on one screen; the sections that follow explain how to run each drill and what usually goes wrong.
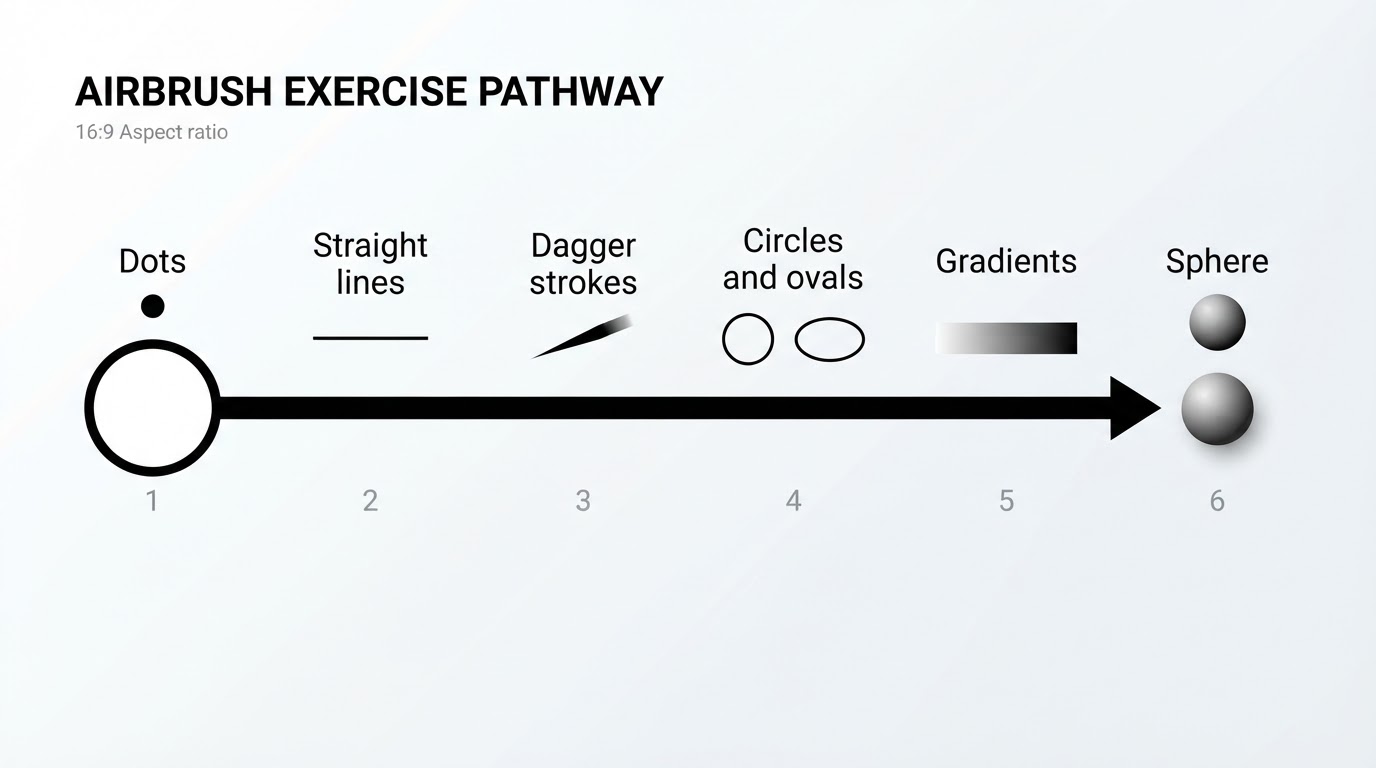
Airbrush exercise | What it trains | Completion standard |
|---|---|---|
Dots | Trigger control and paint volume | Every dot matches in size, with a soft edge and no spidering |
Straight lines | Constant hand speed and distance | Lines stay parallel, with even width from end to end |
Dagger strokes | A controlled taper | Each stroke starts wide and ends in a clean point |
Circles and ovals | Control through direction changes | The start and end meet with no bulge and no gap |
Gradients | Layered tone control | The fade has no hard band where passes overlap |
A sphere | Light, shadow, and control together | Highlight to shadow reads as one smooth transition |
Work through the plan on paper, card, or primed scrap until the standards hold twice in a row. Then repeat the warm-up on a primed test panel; paint behaves differently on a sealed surface than on bare paper. Set up the same way every session: thinned paint that sprays in a smooth mist, a steady nozzle distance, and a clean tip. If a drill suddenly gets harder, change one variable at a time — pressure, mix, or distance.
Dots: the first airbrush exercise to master
Dots teach trigger control — how much paint leaves the brush and how fast it lands.
Run rows of dots at the same distance and the same trigger pull. Press for air first, then add paint, then release the paint before the air. The goal is not a pretty dot; it is a tenth dot that looks like the first.
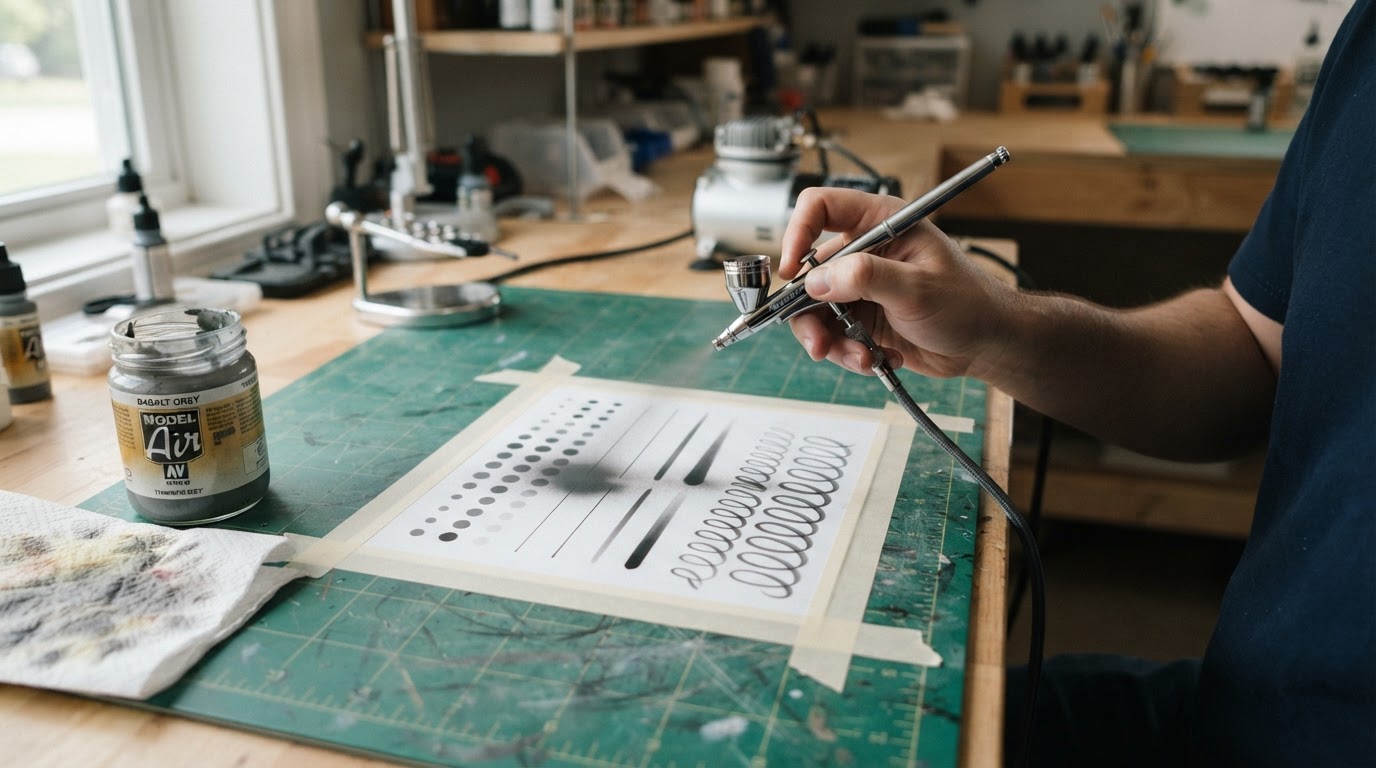
Most beginners fail this drill in one of two ways. Too much paint held too close produces spidering — thin legs of paint radiating from the dot. Slapping the trigger produces a blotch with a hard center. Both are trigger problems rather than hand problems, so slow the pull down and let the airflow settle before paint arrives.
Completion standard: a row of dots that match in size, with soft edges and no spidering.
Straight lines: fix hand speed and distance
Straight lines train you to move your arm at a constant speed while your wrist stays still.
Pull horizontal lines across the page, then vertical, then diagonal. Start moving before the paint goes on and release the paint before you stop. That one habit removes the two common faults: rounded blobs at the start and end, and lines that narrow because your speed changed mid-stroke.
Wobble is almost always a wrist problem, so rest your forearm on the bench and drive the stroke from the shoulder or elbow instead of the fingers.
Completion standard: parallel lines with the same width from end to end.
Dagger strokes: turn control into a usable technique
A dagger stroke starts wide and ends in a point, and it is the first exercise that produces work that looks like airbrushing.
Begin with full paint and air, sweep across the surface, and gradually reduce the trigger until only air remains as you finish. The taper comes from the trigger, not from lifting the brush. Practice at different lengths, in both directions, with the wide end on the left and on the right.
Three faults show up here. A blunt end means the paint was released too late. A hook at the tip means your hand changed direction before the paint stopped. An uneven taper means the sweep and the trigger release are not moving together.
Completion standard: a stroke that reads as one smooth wedge, with no hook and no blunt end.
Circles and ovals: keep control while direction changes
Circles and ovals train the skill straight lines cannot: holding speed and distance steady while your direction changes.
Draw freehand loops, starting small and growing until the motion comes from your arm rather than your fingers. Aim to close the circle cleanly, with the end of the stroke meeting the start without a bulge where the passes overlap. Then stretch the loops into ovals and run them in both directions. Rotate the paper as you work if that keeps your arm comfortable — the goal is a consistent result, not a fixed posture.
Completion standard: a closed loop of even width, with no overlap bulge and no gap.
Gradients: build tone in thin layers
Gradients teach you to build tone in thin passes instead of one heavy coat.
Spray a light-to-dark band by making repeated passes with the flow reduced, overlapping each pass before it flashes off. Keep the brush moving at the end of every pass; stopping with paint on creates a dark spot at the edge of the fade.
Banding means the passes were too few or too wet. Mottling means the paint is too thick or the brush is too far from the surface. This is also the drill that exposes a bad mix, so if you cannot get a soft edge without spatter, fix the paint consistency before you practice anything else.
Completion standard: a fade with no hard edge and no band where two passes meet.
A sprayed sphere: put every skill on one surface
A sphere is the best single test of airbrush control because one shape carries a full range of light and shadow.
Prime a ball, a spare wheel, or any curved scrap part, and fix the light in one position. Spray the highlight first, then build progressively darker layers toward the shadow, working around the shape while you keep the nozzle at a consistent angle.
The sphere is unforgiving in a useful way. Hard edges appear wherever you started or stopped with paint on. Pooling appears where you slowed down. A lost highlight means the darker layers crept too far.
Completion standard: one continuous transition from highlight to shadow, with no hard line and no pooling at the base.
The 15-minute warm-up before you paint a model
Run a short warm-up on paper before every paint session; it tells you what your paint and air are doing today.
A workable routine: about two minutes each on dots, lines, and dagger strokes, then three minutes each on circles, a gradient, and the sphere. Adjust the split toward whichever drill is weakest, but keep at least the first three in the rotation.
The warm-up doubles as a diagnostic. Coarse mist means the paint is too thick or the pressure is too low. Wet, wide lines mean the mix is too thin or you are holding the brush too close. Fix the problem on the paper, not on the model, and note which setting you changed.
How to tell you're ready to paint a model
You are ready when the drills pass their completion standards on a primed surface, not when a set number of hours is up.
- A row of matching dots with soft edges.
- Parallel lines with even width.
- Dagger strokes with a clean point.
- Circles that close without a bulge.
- A gradient with no banding.
- A sphere that reads as a smooth light-to-shadow curve.
Two habits sit on top of the list. You can repeat the results after cleaning the airbrush between drills, and you can change one variable — pressure, mix, or distance — and predict what it will do to the spray. When the list holds on primed scrap, take the same warm-up to the model and start with the largest, flattest surfaces.
Where to take these drills next
The fastest way to improve is to work the drills in a fixed order and check your progress against a written standard.
Airbrush Modeler's step-by-step technique tutorials cover the same ground in more depth: the full single-action workflow from connecting the air source to trigger control, double-action operation, how to pull fine detail lines, and what pressure to spray at, with pressure guidance for model work that never needs to exceed 30 psi. When a drill exposes a gap, read the matching tutorial and run the drill again with one change in mind.
Felo product screenshot.
Airbrush exercise FAQ
Beginner questions about airbrush exercises come down to timing, surfaces, paint, and pressure — none of them need new equipment to answer.
How long should a beginner practice airbrush exercises before painting a model?
Judge readiness by the completion standards, not the calendar. When the dots, lines, and gradient hold on a primed surface twice in a row, you are ready to start on the model and keep drilling in parallel.
What should I practice airbrushing on?
Paper and card for the first pass, then a primed test panel or scrap part for the final check. Paper soaks up paint and hides some faults, while a sealed, primed surface behaves much closer to the plastic on a model.
Can I practice airbrush exercises with water instead of paint?
Yes, for the movement drills. Water is cheap and cleanup is quick, so it works for dots, lines, dagger strokes, and circles. It does not work for gradients or the sphere: without pigment you cannot see coverage, tone, or the mistakes those two drills are designed to expose.
What pressure should I use for these drills?
Start low, and adjust the paint before you adjust the pressure. A setting that lets you lay down a soft dot without a wet blot gives you the most room to learn; if the spray turns coarse or spattery, change the mix and the distance before you reach for more air.
Should I clean the airbrush between drills?
Yes — at least flush the tip. Dried paint at the nozzle changes the spray pattern, and a partially clogged tip mimics the faults these drills are supposed to catch: spatter, uneven lines, and a coarse mist.