What Decanting Spray Paint for an Airbrush Actually Means
Decanting is moving paint out of a pressurized spray can and into an open jar so an airbrush can spray it.
A rattle can pushes paint out mixed with propellant, already atomized at the can's own pressure and spray pattern. An airbrush needs liquid paint instead: no propellant, no can pressure, and a consistency it can draw through a needle. Decanting bridges the two. You catch the paint, let the gas out of it, and then treat it like any other airbrush color.
Modelers decant for three practical reasons:
- Color access. Factory automotive touch-up shades and many hobby lacquers are sold only in spray cans.
- Paint economy. Spraying a can at a model sends a large share of the paint past the subject as overspray; running it through an airbrush puts far more onto the plastic.
- Control. Once the paint sits in a jar, you decide how thin it is, how much pressure it gets, and how fine a line it lays down.
Decanting at a glance
Question | Short answer |
|---|---|
What is decanting? | Spraying rattle-can paint into a jar so an airbrush can use it. |
Why do modelers do it? | To use can-only colors, waste less paint, and control thickness. |
What do you need? | A can, a straw, tape, a clean jar, thinner, gloves, and moving air. |
Does it need thinning? | Usually yes. Decanted paint is normally too thick as it comes out. |
Can you cap the jar right away? | No. Wait until the paint stops bubbling. |
What is the main risk? | Solvent vapor and fire. Decant ventilated, away from ignition. |
Why Decant Instead of Buying Airbrush Paint
Decanting earns its extra steps when the color you need only exists in a can, or when you want more of that can on the model than the nozzle will deliver.
If a color is already sold as ready-to-spray airbrush paint, use it and skip this article. When you need a factory car color, a hobby lacquer, or a finish with a metallic flake that nobody bottles for airbrushes, decanting is the only route from that can to that needle.
The trade-off is handling. Decanting adds solvent exposure, a jar to clean, and a shorter working life for leftovers, because solvent escapes every time the jar is open. Decant the amount you need for the job rather than emptying the can into storage.
What You Need Before You Start
The basic kit is a spray can, a short drinking straw, tape, a clean jar, a compatible thinner, and a ventilated workspace.
- A spray can you are willing to test on scrap first.
- A clean drinking straw, cut down to a couple of inches, plus masking or electrical tape to seal it to the nozzle.
- A small glass jar, or a plastic jar you know the solvent will not attack, with a lid.
- Nitrile gloves and eye protection.
- The thinner recommended for that paint line, not a generic substitute you have not tested.
- Paper towel, a fine strainer, a stirrer, and a scrap card for test sprays.
Make two compatibility checks first. Match the thinner to the binder: lacquers, enamels, and water-based acrylics each need their own chemistry, and a universal thinner that works for one may cloud, curdle, or fail to mix with another. Then check what is already on the model, because a hot lacquer over a cured acrylic layer can wrinkle the coat underneath. Test both on scrap, not on the model.
The Straw-and-Jar Method, Step by Step
The straw method works by sealing a short tube over the can's nozzle and aiming the spray into a jar, where the paint is caught instead of fogged into the air.
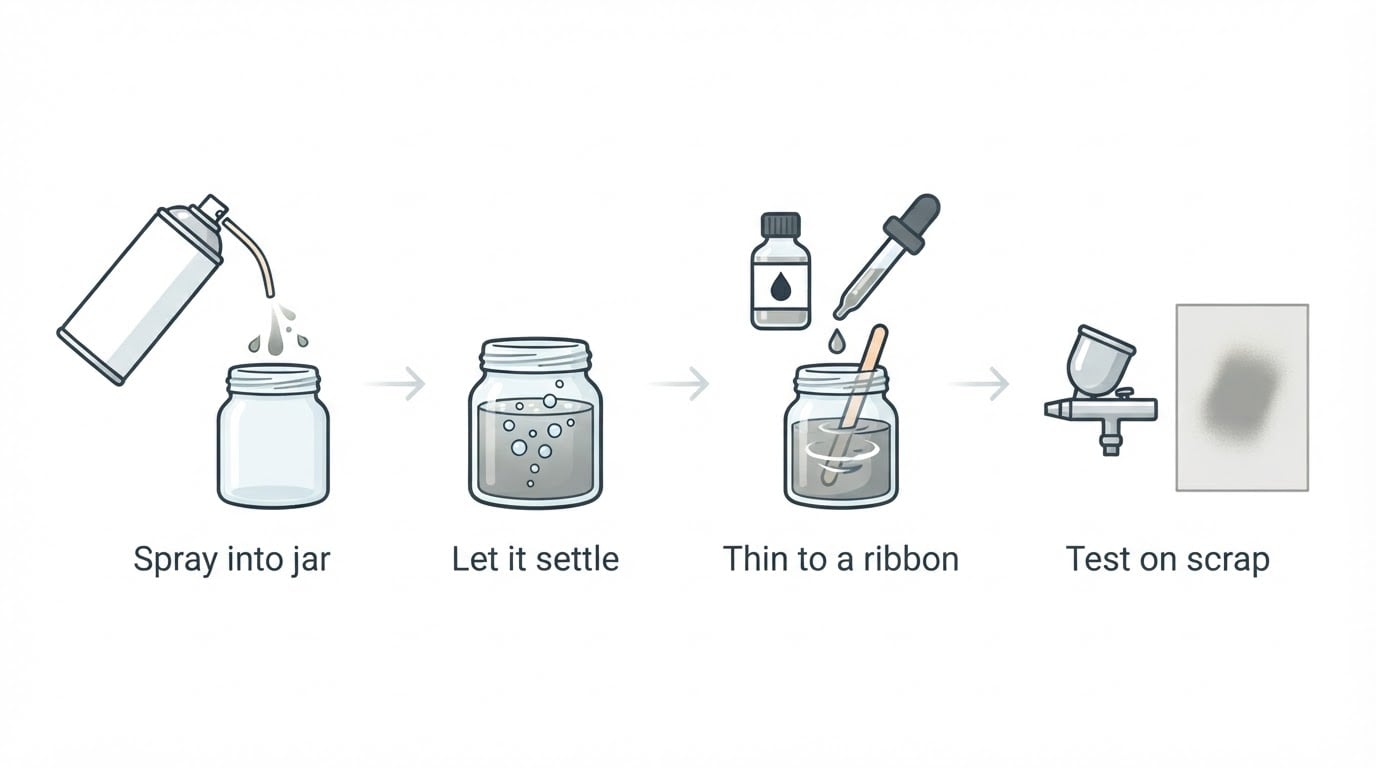
- Set up the air first. Work outdoors or in strong cross-ventilation, with no flames, pilot lights, heaters, sparks, or running motors nearby. Aerosol paint releases flammable solvent vapor, so moving air and distance from ignition sources matter more than any other step here.
- Bring the can to room temperature and shake it for the time the label recommends. Cold paint is thicker, mixes poorly, and foams for longer.
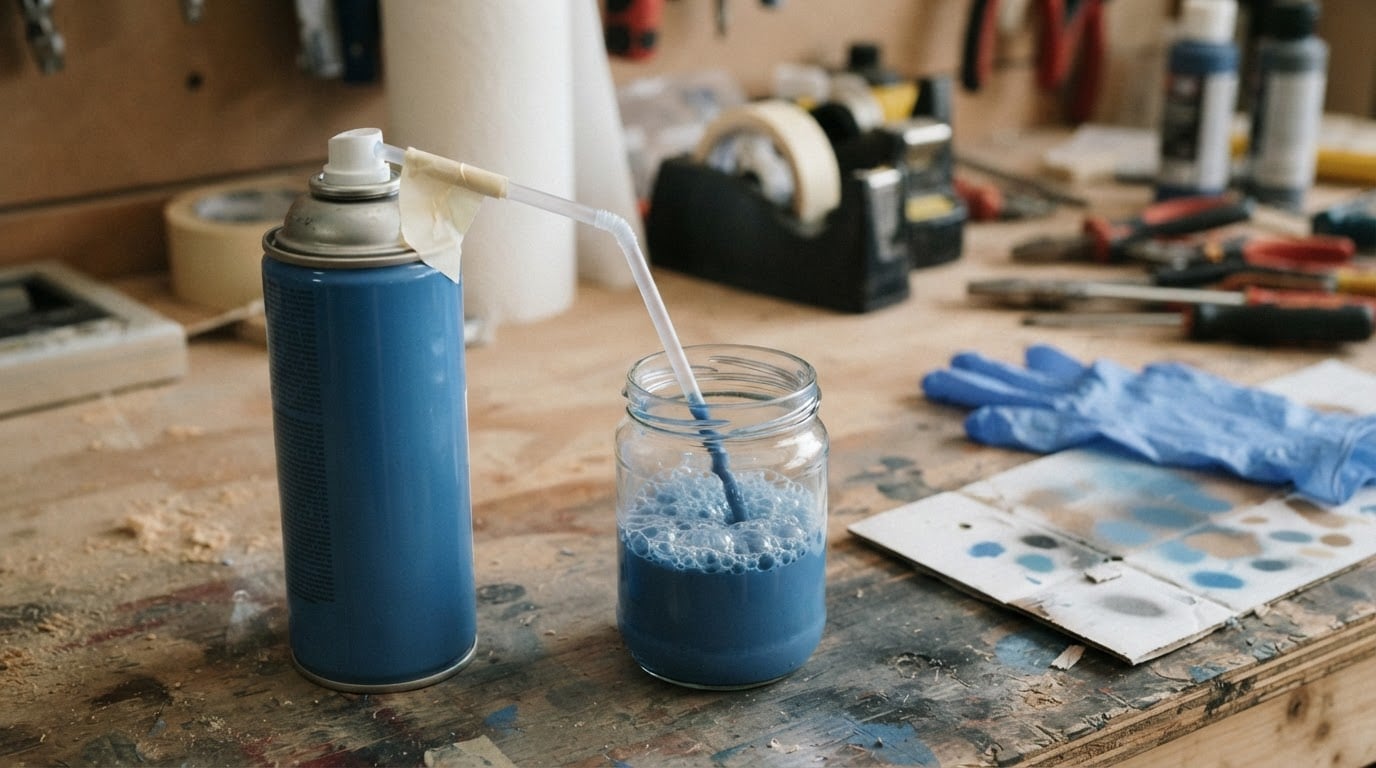
- Fit the straw. Cut it short, push one end over the nozzle, and tape the joint so pressure cannot blow it off. A short straw leaves less paint clinging inside.
- Position the jar. Angle the jar so the straw points at the inside wall rather than the bottom; that spreads the impact and cuts down on splashing. Keep a folded paper towel around the mouth of the jar to catch drift.
- Spray in short bursts. One or two seconds on, then a pause, then repeat. Long continuous bursts foam the paint and warm the can. Leave headroom in the jar for stirring and thinning.
- Let the propellant escape. The paint will hiss, foam, and bubble as gas comes out of solution. Cover the jar loosely with a paper towel and wait until the bubbling stops. Never seal a jar that is still gassing.
- Strain paint that looks lumpy. A fine mesh strainer removes the specks that older cans and metallic finishes carry, and those specks are what clog a nozzle.
- Thin it before it goes near the airbrush, then label the leftovers with the color and the date. The next section covers judging and adjusting the mix.
Judging Consistency and Thinning Before You Spray
Decanted paint is almost never airbrush-ready straight out of the jar. Judge it by how it runs off a stirrer, then thin it in small steps until a test spray lays down a smooth coat.
Lift your stirrer out of the paint and watch it fall. A well-thinned airbrush mix runs off in a thin, unbroken ribbon. The classic comparison is skim milk: fluid, slightly clingy, and quick to level out. Paint that drops off in globs or clings to the stirrer is too thick; paint that runs off like water and beads on scrap plastic is too thin.
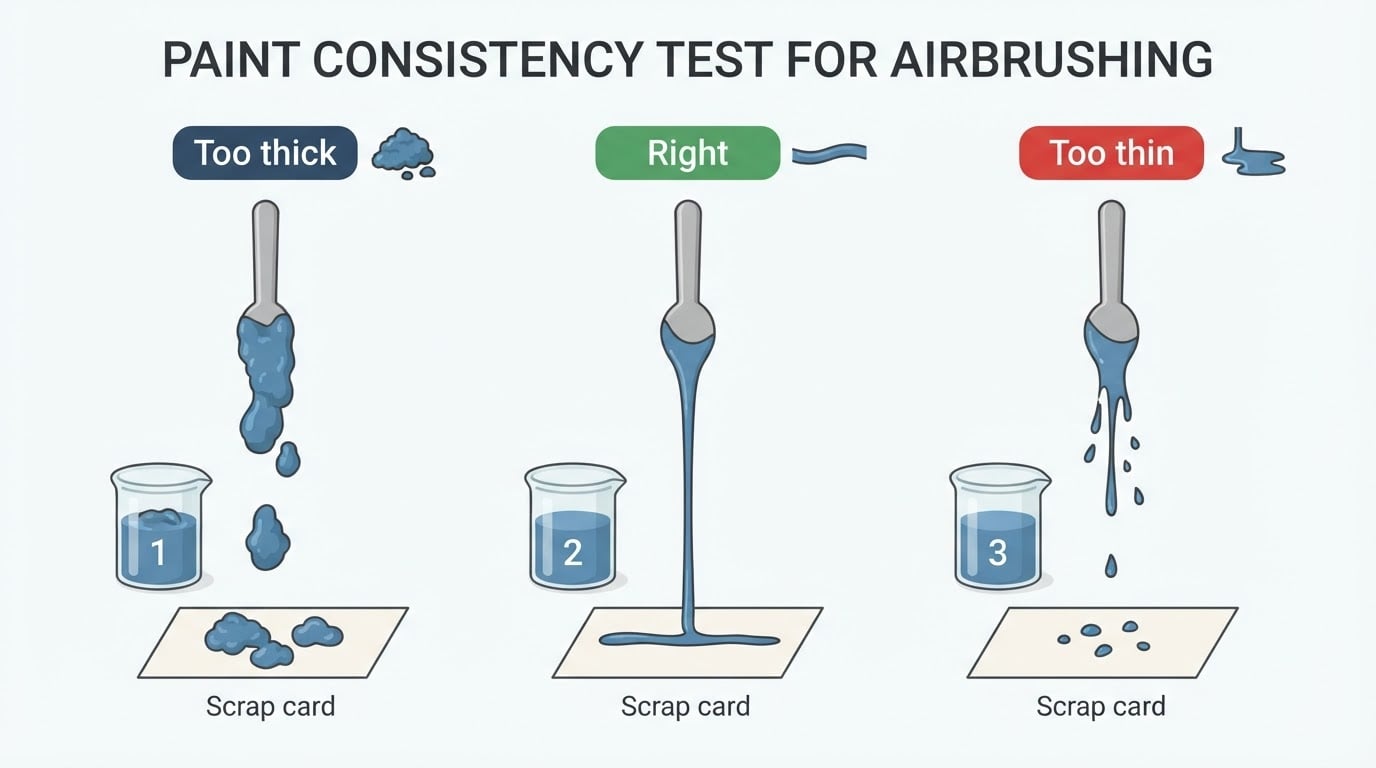
The symptoms on the model tell the same story. Too thick means tip dry, spitting, and a grainy or orange-peel finish. Too thin means spatter, tiger striping, weak coverage, and poor bite on the plastic. The middle ground is a smooth, even coat that flashes off flat without running.
Add thinner in small increments: a few drops, a stir, a test spray on scrap. Repeat until the test line is even, then write down the mix that worked, because a different can of the same color will still need checking.
Forum recipes for homemade thinners are unverified hobby suggestions, not manufacturer guidance. You will find threads that blend industrial solvents such as xylene and acetone by eye and report good results, and people who ruined a model's plastic following the same posts. Treat every such ratio as one unnamed person's experiment. The reliable route is the thinner made for your paint line, added in small increments, with ventilation, gloves, and a test spray on scrap before anything touches the model. Airbrush Modeler's own paint guides cover this ground for specific paint lines, including decanting spray-can paint into airbrush-ready paint and thinning named products such as Tamiya acrylics with lacquer thinner.
Common Mistakes and What Decanting Will Not Fix
Most decanting failures come from capping the jar too early, spraying paint that is still gassy, or expecting the chemistry to do something it will not.
Mistakes to avoid:
- Sealing the jar while it is still bubbling. Gassing paint keeps releasing vapor, and a tight lid turns the jar into a pressure vessel.
- Spraying wet, foamy paint. Bubbles in the cup become spatter at the nozzle; wait for the foam to collapse.
- Using a jar the solvent attacks. Some plastics cloud, soften, or crack on contact with lacquer thinner.
- Skipping the strainer on old or metallic paint. Flakes and dried specks, not the paint itself, are what clog nozzles.
- Decanting more than you can use, or storing it unlabeled. Every open jar loses solvent, and a mystery jar is one you will not trust on a good model.
What decanting will not fix:
- A mismatched thinner. If the thinner does not belong to that paint system, stirring will not make it spray well.
- A two-part paint. Paints that cure with a hardener start setting once mixed, and a jar of activated paint can turn solid in the container or the brush. Decant only what you can spray promptly.
- A different finish than the can. Decanted paint can lay down gloss, color, or texture slightly differently from the can's own nozzle, so test on scrap before committing the color to a model.
Ventilation, Flammability, and Storage
Aerosol paint releases flammable solvent vapor, so the two rules that matter most are moving air and no ignition source.
- Decant outdoors, or at a window with airflow through the room; a closed bedroom or garage concentrates vapor quickly.
- Keep flames, pilot lights, heaters, stoves, and sparking motors away from the work area, and do not smoke near decanted paint or wet paper towels.
- Wear nitrile gloves and eye protection, and keep the paint off your skin; solvent-based paints are not kind to repeated contact.
- Leave the jar open while it is gassing. A sealed jar of gassing paint builds pressure, and the lid can fail with force.
- Store labeled jars upright with the lid tight, in a cool place out of reach of children and pets, and use them within a reasonable time. Dispose of paint waste, thinner, and contaminated towels according to local rules, never down a drain.
FAQ: Decanting Spray Paint for an Airbrush
Before you start
Can you use spray paint in an airbrush? Yes, but not straight from the can. Decant it, let the propellant escape, thin it, strain it, and test the mix on scrap before it goes near a model.
Which spray paints decant best for an airbrush? The ones whose thinner you can identify and buy. Hobby lacquers and automotive color cans are the usual candidates, and both reward a test spray before a full paint job.
Can you decant spray paint for a car model? Yes. That is one of the most common reasons to decant, because a factory color sold only in a can can still go through an airbrush for a thinner, smoother finish than the can alone produces.
Do you need special decanting tools? No. A short straw and tape are enough. Whatever directs the spray, the principle is the same: seal the nozzle, catch the paint in a jar, and let the gas out.
During the transfer
How long should decanted paint sit before you use it? Until the bubbling stops. Cold paint foams for longer, so give it more time if the can was cold.
Can you decant part of a can and leave the rest? Yes. Decant what you need for the job and the can keeps the remainder.
Can you thin decanted paint with tap water? Only for water-based acrylics, and even there water is not the thinner the paint was formulated for, so test the result. For solvent-based lacquers and enamels it will not mix at all.
Should you shake the jar? Once the fizz has stopped, close the lid and swirl it gently; shaking a gassy jar just makes more foam.
After the transfer
Will decanted paint clog an airbrush? It can if it is too thick, poorly mixed, or unfiltered. Strain it, thin it, and clean the airbrush after each session, and the brush stays out of trouble.
How should leftover decanted paint be stored? Labeled, upright, with the lid tight and in a cool spot. Expect it to thicken, and check the consistency again before the next session.
Can you brush decanted paint instead of spraying it? For small touch-ups, yes, but rattle-can paint is formulated for spraying, so brushed on it dries fast and tends to show marks.
When should you not decant at all? When the paint cures with a hardener, when the can already sprays badly, and when you have not tested the thinner on scrap. Use a paint that is already made for the airbrush instead.