Why an airbrush sprays water instead of paint
One common source is humid room air drawn into the compressor. As compressed air cools through the tank, fittings and hose, some vapor can condense into droplets that travel to the nozzle. Another source is liquid left in the airbrush after a cleaning flush. The tests below separate those paths.
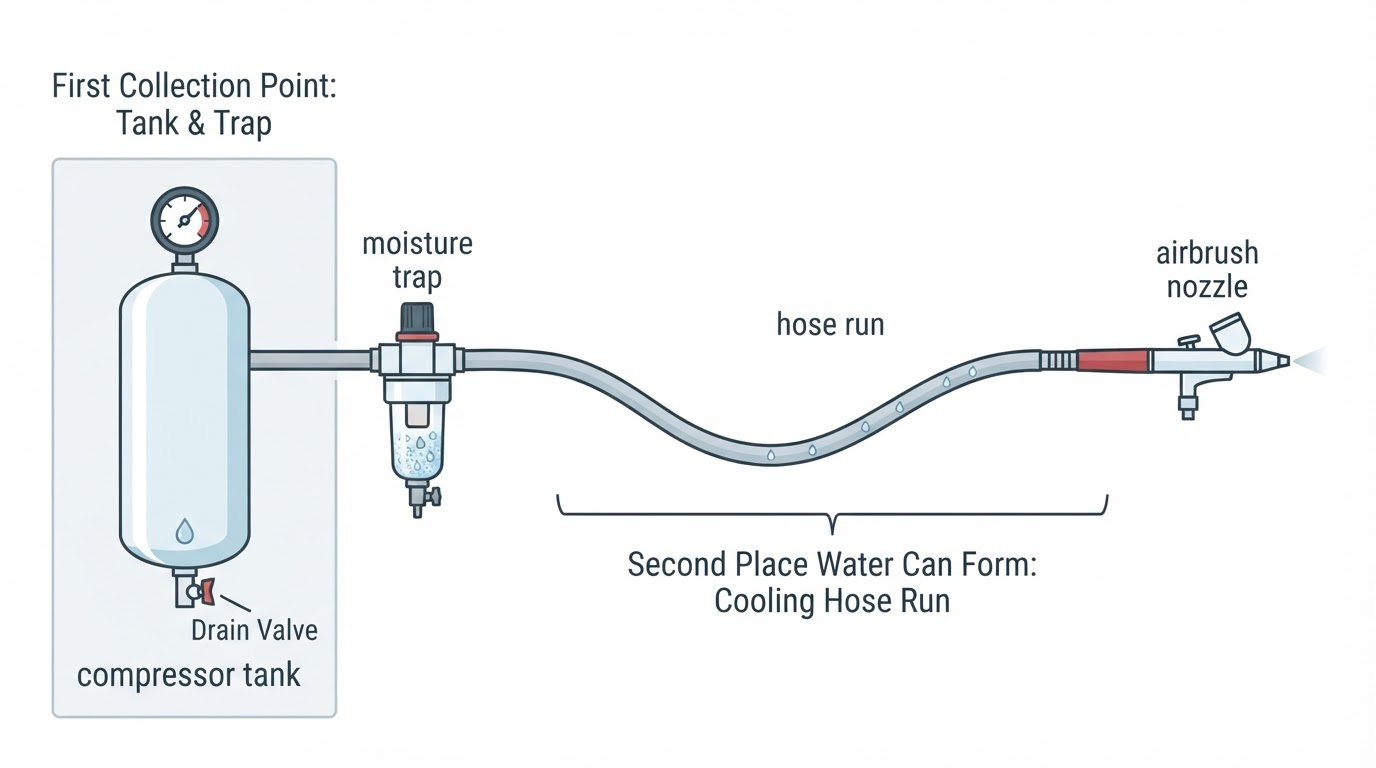
A moisture trap does not remove humidity. Its job is to collect liquid water after the vapor has condensed, which is why a compressor with a built-in filter can still spit water. If the air is still warm when it passes the first trap, some water stays as vapor and condenses farther down the line — in the hose, at a quick-disconnect fitting, or inside the brush.
That also explains the timing. Water problems often appear a few minutes into a session, once the compressor has run long enough to warm up, or on humid days when the air simply carries more moisture. A cool room, a cold floor under the hose, or a long run between the trap and the brush all give condensation more opportunity.
What clear droplets rule out — and what they point to
Before you touch the paint mix, look at what is actually landing on the surface:
- Clear droplets with an empty, dry cup suggest the air line, but residual liquid in the brush is still possible; repeat after a careful dry wipe and test purge.
- Colored spatter that matches the cup is a paint-side fault: over-thinned paint, paint that has partially dried, a partly blocked nozzle, or an air leak. An airbrush that is too wet with over-thinned paint behaves this way, and a primer mixed too watery does the same.
- Watery spits that smell of solvent, right after a cleaning flush, are usually residual cleaner or rinse water in the paint path.
- Spitting that builds as the session goes on fits the condensation profile, because the compressor gets warmer and the air has longer to cool in the line.
If the spits are clear, adding thinner will not help. Thinner changes paint consistency; it cannot remove water from the air. Adding thinner to chase a moisture fault usually produces runs on top of the spitting.
If droplets are paint-colored rather than clear, pause this water-line check and use the site's general airbrush troubleshooting guide for paint-path symptoms.
How to stop an airbrush spraying water: the check order
Work through this checklist from the cheapest check to the most involved one, and test after each step:
- Empty and wipe the cup, purge residual cleaner, then run the air-only paper test below. If clear droplets still appear, investigate the air path.
- Drain the compressor tank and the moisture trap, following the maker's procedure for releasing pressure first.
- Check the trap bowl, its seating, and its position. A full bowl, a tilted trap, or a loose bowl lets collected water travel into the hose.
- Check the hose for standing water, then purge it away from the model.
- Re-test on paper, air only.
- If droplets still appear, add a point-of-use filter close to the airbrush and shorten the run between the last trap and the brush.
You are finished when a full minute of air-only spraying leaves the paper dry and a test line of paint sprays evenly, with no droplets or spatter.
Check the moisture trap and the tank first
The tank and the trap are where most condensed water should be stopped, so they get checked before anything else.
- Check and drain the tank at the interval and by the method in your compressor manual; water can pool at the bottom and eventually travel down the line.
- Keep the trap bowl shallow. Once the bowl is full, water has nowhere to collect and travels straight through. Empty it while it is still visibly shallow rather than waiting for it to fill.
- Mount the trap the way the maker intended. Traps are built to sit upright so collected water falls to the bottom of the bowl; a trap hanging at an angle can leak that water back into the air stream.
- Hand-tighten bowls and seats. A loose bowl, a flattened O-ring, or a cracked bowl lets air bypass the collecting chamber, which is easy to miss because the airbrush still sprays.
- Replace a damaged bowl or seal rather than working around it, and clean or replace a dirty element as the instructions say. A trap that cannot pass air properly stops collecting.
- If there is no trap at all on the compressor outlet, that is the missing part. Add one before you look for subtler causes.
Compressor designs differ, so use the drain valve and trap layout in your own unit's documentation rather than a generic procedure. Manufacturer material for Iwata airbrush compressors and their equipment setup is a useful reference point for how the compressor end of the air path is arranged.
Where water hides in the hose
The hose is the part of the air path people forget, and it is often where the droplet that reaches your model actually forms.
Air cools as it travels, and the inside wall of a long hose gives that vapor a surface to condense on. A hose lying on a cold floor, in a cool room, or in a garage overnight collects droplets that the first trap never saw. You then get a burst of water at the start of the next session, before the line clears.
Simple habits remove most of it:
- Disconnect and hang the hose end-down after every session so any liquid inside can drain out.
- Before you attach the airbrush, purge the hose with a few short bursts, pointed away from the model and any wet paint.
- Keep the hose off cold floors and out of cold drafts where practical.
- Keep the run from the last trap to the airbrush as short as your setup allows; every extra meter of hose is another place for vapor to cool.
- On humid days, drain the tank and trap more often, and expect condensation to build faster during long sessions.
A safe test with clean water and a paper target
This check separates an air-line fault from a paint-path fault without stripping the brush. It needs clean water and a plain paper target.
- Set the regulator to the pressure you normally spray at, then empty and wipe the cup.
- Hold the airbrush a hand's width from the paper, trigger air only, and give it a few short bursts across a clean part of the page. Keep the tip away from your fingers and away from the model.
- Look at the paper in good light. Clear rings or droplets mean water is arriving with the air. A dry page means the air path is delivering clean air at that moment.
- Fill the cup with clean water only and spray a short line on a fresh part of the paper. An even wet line that dries without residue suggests the paint path is clear; a colored or oily film, or a very uneven burst, points to leftover paint or cleaner in the nozzle and needle path.
- Wipe the needle tip and flush between the two steps so the first test cannot contaminate the second.
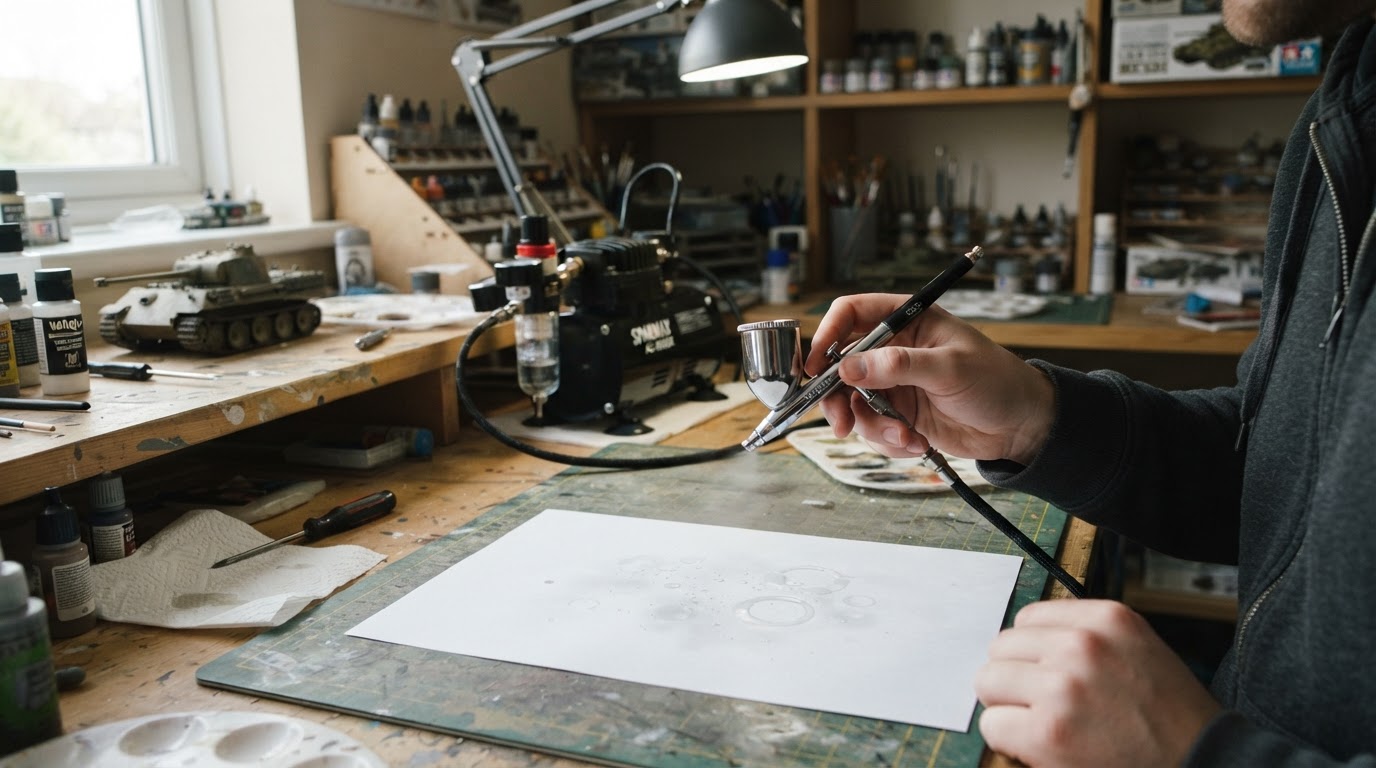
Do not raise the pressure to force a result and do not disassemble the brush to chase the fault; the test is a diagnostic, not a cleaning procedure. If step 3 shows droplets, work on the tank, trap, and hose. If step 4 shows residue, clean and flush the paint path before loading paint, then test again.
Symptom-to-check table for watery spatter
What you see | Most likely source | First check |
|---|---|---|
Clear droplets with an empty, dry cup after a test purge | Condensation in the tank, trap, or hose is possible | Check and drain as the manual directs, then re-run the air-only test |
Clear droplets only after the compressor warms up | Warm air passing the trap and condensing downstream | Check the bowl level and add a point-of-use filter near the brush |
Droplets in the first burst of the day | Water that condensed in the hose overnight | Hang the hose end-down and purge before spraying |
Watery, colored spatter with paint loaded | Over-thinned paint, poor atomization, or a partial clog | Check the mix and the tip before blaming the air line |
Solvent-smelling spits after cleaning | Residual cleaner or rinse water in the paint path | Flush, dry, and test-burst on scrap |
Spatter with bubbles in the cup | Air leaking into the paint passage | Stop and check nozzle and head seating |
Safe draining and cautious maintenance
Draining a compressor is a small job, but it involves stored pressure, so keep it simple and follow the manual:
- Unplug the compressor and release stored air before opening a drain valve; some units hold pressure even when switched off.
- Drain into a rag or container rather than the bench or floor, and open valves slowly.
- Let the unit cool before moving it or working near the cylinder head.
- Do not open the compressor housing, loosen fittings under pressure, or bypass the moisture trap; none of that is needed to diagnose watery spatter.
- Hand-tighten bowls and fittings only, and fit new seals and bowls properly rather than overtightening a worn part.
When the spitting is not water
Water is only one cause of spatter, and the fixes are different. If the spits are paint-colored, or the pattern breaks up with bubbles, blocked flow, or a needle that stops moving, the problem is in the paint path rather than the air line. The broader airbrush troubleshooting guide sorts those symptoms — spitting, clogs, bubbles, and no paint flow — and is the page to follow when the air-only test comes back clean.
Dried paint on the needle is another look-alike. Airbrush tip dry produces a weakening pattern and partial spatter that clears when the tip is wiped; it is a paint and airflow problem rather than moisture, and it responds to thinning within the maker's range and a different trigger rhythm instead of to draining the trap.
If your airbrush is splattering, the color of the spatter is the fastest clue: colored spatter that follows the paint and a clean air-only test point to a paint fault, while clear or watery spatter means the water path is the place to start. Keeping the two apart saves you from adjusting the mix for a moisture fault, or draining the tank for a tip-dry fault.